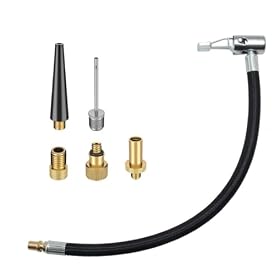
A long hose makes it easier to inflate a fat bike while the bike remains in a repair stand, but hose reach is only part of the buying decision. Look for a stable base, a readable gauge, a chuck that fits your valve, and a pressure range suited to wide, low-pressure tires.
A long-hose floor pump is usually the most convenient choice for inflating a fat bike in a repair stand. The extra reach lets you keep the pump on the floor while connecting to a wheel raised off the ground, reducing the need to balance or reposition the bike. Prioritize hose length and flexibility, but also check the pump’s valve connection, gauge placement, base stability, and usable low-pressure range.
What to look for
A hose that reaches the raised wheel
Measure from the floor to the valve location when the bike is in your stand, then allow extra length for routing around the frame, fork, or work stand. A hose that only barely reaches may pull on the valve or tip the pump while you operate the handle.
A longer hose is especially useful when:
The bike is clamped high in a repair stand
You inflate the front wheel while it is still mounted in the fork
The rear wheel remains installed in the frame
The pump sits behind or beside the work stand rather than directly below the valve
Flexibility matters as much as nominal length. A stiff hose can still be awkward around a fat-bike frame, while a flexible hose is easier to position without placing sideways force on the valve stem.
A stable floor-pump base
Fat-bike tires can require substantial air volume, so you may make more handle strokes than with a narrow road tire. Choose a pump with a broad, stable base and a handle that is comfortable to grip. A narrow or lightweight pump can move around when the hose is stretched toward a raised wheel.
Place the pump where the hose can run in a gentle curve. Avoid pulling the hose sharply upward from the pump or across a busy area where it could catch on the stand.
A chuck that fits your valve
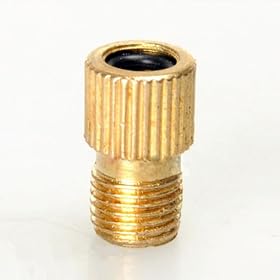
Most fat bikes use either Presta or Schrader valves, depending on the wheel and tube setup. Before buying, confirm that the pump head supports the valve on your bike. Some pumps use a dual-compatible head, while others require changing an internal insert or using a separate adapter.
The chuck should lock securely without bending the valve stem. If your fat bike has a deep rim, a short valve stem, a tubeless setup, or a valve mounted at an awkward angle, the head’s shape and locking method can matter more than the pump’s maximum pressure rating.
For a Presta valve, remove the small valve nut before attaching the chuck and loosen the valve core nut slightly. Do not force the pump head onto the valve. For a Schrader valve, the connection is similar to an automotive tire valve. Follow the pump manufacturer’s instructions for switching between valve modes.
A gauge that is easy to read at low pressure
Fat-bike tires are commonly used at lower pressures than many road or hybrid tires, so a gauge with clear markings in the low-pressure portion of its scale is more useful than a gauge designed mainly for very high pressures.
A gauge mounted near the pump base may be difficult to read when the bike is elevated. A handle-mounted or hose-mounted gauge can be easier to see, but the best layout depends on how your stand is positioned. If possible, choose a pump whose gauge can be viewed while you hold the chuck at the valve.
The gauge is a guide rather than a substitute for following the tire and rim manufacturer’s limits. Start with the recommended pressure for your tire, rim, rider weight, terrain, and tubeless or tube setup, then make small adjustments as appropriate.
Enough air volume for wide tires
A fat-bike tire holds much more air than a typical narrow bicycle tire. A floor pump is generally preferable to a small hand pump for home use because its larger barrel and full-length handle make repeated inflation easier.
Do not select a pump solely by its maximum pressure. Fat-bike inflation usually benefits more from efficient air delivery, smooth operation, and a gauge that remains useful at the pressure you actually ride. A high-pressure road-oriented pump may work, but it may be slower or less convenient if its gauge is difficult to interpret at low pressure.
Long hose versus extra-long hose
A standard floor-pump hose may be adequate if the stand keeps the valve close to the floor. For a bike raised to waist or chest height, a longer hose is more practical. Extra length is useful when the pump must remain outside the stand’s footprint, but excessive slack can become a trip hazard or snag on the bike.
Use this simple check before buying:
Put the bike in the stand at the height where you normally work.
Measure from the floor to the front and rear valve positions.
Add room to route the hose around the frame or stand.
Compare that measurement with the manufacturer’s stated hose length.
Confirm that the hose can reach without pulling the pump off its base.
If the manufacturer does not clearly state hose length, look for a product manual or contact the manufacturer rather than relying on a vague description such as “extra-long hose.”
Product prices and availability are accurate as of the date/time indicated and are subject to change. Any price and availability information displayed on Amazon.com at the time of purchase will apply to the purchase of this product.
Can a regular floor pump inflate a fat-bike tire?
Yes, provided the pump’s valve head fits your bike and its pressure range includes the tire’s required pressure. A regular floor pump may be perfectly suitable for a fat bike, particularly for topping up air or inflating a tube.
A dedicated high-volume pump can be more convenient when installing a tubeless fat-bike tire, but ordinary inflation and tubeless seating are different jobs. Seating a tubeless bead may require a high-volume chamber or a separate air source, and not every floor pump is designed for that task. Check the tire, rim, and pump manufacturer’s instructions before attempting tubeless installation.
Features that are useful but not essential
Locking lever or threaded connection
A locking lever allows quick attachment and removal. A threaded connection can provide a secure seal but takes longer to use and may place more twisting force on the valve. Choose the style that lets you connect without disturbing the bike in the stand.
Replaceable hose and seals
A replaceable hose, chuck, or seal can extend the pump’s useful life. This is particularly worthwhile if the pump will be used frequently in a workshop. Confirm that replacement parts are available for the specific pump rather than assuming parts are interchangeable.
Dual-scale gauge
A gauge showing both common pressure units can be convenient if your tire sidewall, pump instructions, or preferred setup uses a different unit. Clear low-pressure markings are more important than having the largest possible scale.
Bleed button
A pressure-release button can make small adjustments easier, especially when the gauge is visible near the handle or hose. It is not essential, but it can reduce the need to remove the chuck repeatedly while fine-tuning pressure.
Setup tips when the bike is in a stand
Clamp the bike securely according to the stand manufacturer’s instructions before attaching the pump.
Keep the pump base on a flat, dry surface.
Route the hose away from the stand’s legs and your working position.
Support the valve area if the hose pulls sideways on a short or flexible valve stem.
Do not rotate a wheel with the pump head attached unless the hose has enough slack and the valve connection will not be stressed.
Check the tire sidewall and rim limits before inflating.
Stop if the valve, tube, or rim appears damaged or if air is escaping around the connection.
If the chuck leaks, first remove it and inspect the valve and chuck seal for dirt or damage. Reattach it squarely and verify that the pump is set for the correct valve type. If the leak continues, replace the chuck seal or the pump head if replacement parts are available.
When a different pump makes more sense
A long-hose floor pump is best for workshop or home inflation. A mini pump is more appropriate for carrying on a ride, while a CO2 inflator is useful for a compact emergency refill but offers limited capacity and requires cartridges. A separate high-volume air source may be more suitable for repeated tubeless bead seating.
For one pump that stays in a repair area, choose the long hose, stable base, compatible chuck, and readable low-pressure gauge. If the hose reaches comfortably but the pump still feels unstable, choose a heavier or wider-base model rather than adding an improvised extension. If the pump head damages the valve or cannot seal reliably, replace the head or pump instead of forcing the connection.
FAQ
How long should a hose be for a floor pump used with a fat bike in a stand?
Measure from the floor to the valve when the bike is clamped at your normal working height, then add enough length to route around the frame and stand without pulling on the valve. The required length depends on the stand, bike, and wheel position.
Do fat bikes need a special floor pump?
Not necessarily. A standard floor pump can work if it supports the bike’s valve type, delivers enough air volume, and has a gauge that is readable at the tire’s intended pressure. A high-volume pump may be more convenient for wide tires or tubeless setup.
Is a high maximum PSI important for a fat-bike pump?
Usually not. Fat-bike tires are generally used at relatively low pressure, so air volume, smooth operation, chuck compatibility, and clear low-pressure gauge markings are more relevant than an unusually high maximum-pressure rating.
Can I leave the rear wheel on the bike while inflating it in a repair stand?
Yes, if the hose reaches without pulling sideways on the valve and the pump remains stable. Route the hose carefully and avoid rotating the wheel with a connected chuck if doing so could strain the hose or valve.