Best CO2 setup that still includes a mini pump backup
A CO2 inflator is fast, compact, and useful after a roadside flat—but it should not be your only inflation option. The most dependable setup pairs a compatible inflator and cartridges with a small mini pump that can finish the job if a cartridge leaks, runs out, or fails to seat the tire bead.
What do you need help with?
Open an answer, or tell us what we should cover next.
Answered in this guide
Prevent a CO2 cartridge from over-inflating a bike tire
Use a push-button or lever-controlled inflator, match it to the tire and valve, and release CO2 gradually. This gives better control on narrow or high-pressure tires and reduces the chance of dumping a full cartridge into the tire.
Check whether the inflator fits Presta or Schrader valves and whether it suits your tire type, including tubeless tires. A secure valve seal helps prevent leaks and failed inflation at the roadside.
Choose cartridge capacity based on tire volume and the number of attempts you may need. Smaller cartridges save space, while larger ones provide more margin for high-volume tires or a failed first inflation.
Choose a mini pump that can finish inflating a flat
Carry a mini pump that connects securely to your valve and can raise the tire to rideable pressure, rather than one designed only for small top-offs. Consider pump volume, mounting, and hose style.
Requests help us prioritize the next guide. No email required.
One anonymous request per topic.
A good CO2 setup should include two things: a fast inflator for getting back on the road and a mini pump backup for when a cartridge is empty, damaged, or not enough for the repair. The best combination depends on your tire volume, valve type, riding distance, and whether you carry a spare tube or repair a tubeless tire.
What a complete CO2 backup setup includes
A practical roadside setup usually contains:
CO2 inflator head: Controls the release of compressed gas into the tire.
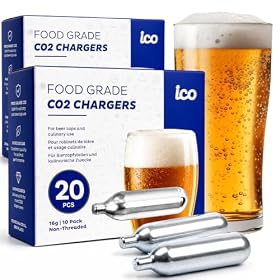
Threaded or non-threaded CO2 cartridge: Supplies the gas. The cartridge must match the inflator's connection type.
Mini pump: Provides unlimited manual inflation as a backup, although it is slower.
Spare cartridge: Useful when one cartridge may not be enough for a large tire, a failed inflation, or more than one flat.
Valve-compatible parts: The inflator and pump must work with your bike's Presta or Schrader valve, either directly or through an adapter.
Storage method: A jersey pocket, saddle bag, frame bag, or bottle-cage mount keeps the parts together and accessible.
A CO2 inflator without a pump backup is compact, but it leaves you dependent on a cartridge and a working inflator head. A pump-only setup is more reliable but takes longer. Carrying both gives you speed and redundancy.
Choose the inflator type first
Push-button or lever-controlled inflators
These let you control the gas flow, which helps prevent overinflating a narrow road tire. They can also make it easier to add a small amount of air rather than releasing the entire cartridge at once.
Check that the control is easy to operate while holding the tire and valve steady. A design that requires awkward positioning can be frustrating during a roadside repair.
Simple screw-on inflators
A screw-on head is compact and usually straightforward: attach the cartridge, connect the head to the valve, and release the gas according to the instructions. The tradeoff is that some designs offer less control over the initial burst.
Avoid loosening a cartridge or inflator while pressurized unless the manufacturer specifically explains that procedure. Cold gas can also make the cartridge and inflator uncomfortable to hold, so keep fingers clear of the outlet and follow the included instructions.
Inflators with integrated pumps
Some compact units combine a CO2 head and a small manual pump. This can reduce the number of separate items you carry, but the pump section may be less capable than a dedicated mini pump. Check the packed size, valve connection, and whether the manual mode works independently of the cartridge.
Product prices and availability are accurate as of the date/time indicated and are subject to change. Any price and availability information displayed on Amazon.com at the time of purchase will apply to the purchase of this product.
Match the setup to your tire and valve
Presta valves
Presta valves are common on road, gravel, and many higher-pressure bikes. The valve core and locknut need to be handled carefully, and the inflator must form a secure seal around the narrow valve stem.
If you use removable-core tubeless valves, verify whether the inflator can connect without loosening or damaging the core. A valve-core tool may be useful for tubeless repairs, but it is not a substitute for a compatible inflator head.
Schrader valves
Schrader valves are wider and are common on many mountain, hybrid, and utility bikes. Some inflators support Schrader valves directly; others use a reversible head, an adapter, or a separate connection.
Do not assume that a pump labeled for one valve type will automatically support the other. Confirm the valve connection before buying, especially if you carry the same repair kit for multiple bikes.
Tubeless tires
CO2 can inflate a tubeless tire quickly and may help reseat a bead after a puncture. However, tire sealant can be affected by CO2 in some setups, and the tire may need to be reinflated with normal air afterward. Follow the tire, sealant, and inflator manufacturer's guidance.
For a tubeless bike, your roadside kit may also need tire plugs, a plug tool, valve-core tools, and a way to add sealant. A CO2 inflator alone does not repair the puncture.
Product prices and availability are accurate as of the date/time indicated and are subject to change. Any price and availability information displayed on Amazon.com at the time of purchase will apply to the purchase of this product.
Select cartridge capacity conservatively
Cartridge size affects how many attempts you have and how much air the tire can receive. Smaller cartridges save space and weight, but they may provide less margin for a high-volume tire, a failed first attempt, or a second repair.
As a general rule:
Narrow road tires: Often need less gas than high-volume tires, but an unsuccessful seating or connection can waste a cartridge.
Gravel and larger-volume tires: Benefit from carrying more capacity or an extra cartridge.
Mountain bike tires: Usually need substantially more air volume than road tires, so a single small cartridge may be inadequate.
Multiple bikes or group rides: Carry cartridges sized for the largest tire you may need to inflate, or carry more than one cartridge.
Read the cartridge and inflator specifications together. A larger cartridge is not automatically better if it does not fit the inflator, cannot be stored securely, or encourages you to skip the pump backup.
What makes a good mini pump backup?
The backup pump should be capable of inflating your tire to a rideable pressure, not merely topping it off. Look for these features:
Correct valve connection
A reversible or dual-valve head can be convenient, but simple designs may be easier to operate under stress. Confirm whether the pump uses a screw-on connection, a lever lock, or a push-on head.
Appropriate pump volume
High-pressure road pumps move less air per stroke and are compact, but they take more strokes on high-volume tires. High-volume pumps inflate wider tires faster, though they may be larger and may not reach the pressure needed by narrow road tires as easily.
Some pumps use a selectable high-volume/high-pressure mode. This can make one pump more versatile, but it adds parts and a control to learn before a ride.
Secure mounting or storage
A pump that rattles loose from the frame or does not fit your saddle bag is not a useful backup. Check the pump's packed length against your storage space, and make sure its mount does not interfere with bottle cages, suspension movement, or frame hardware.
Hose versus direct connection
A flexible hose can reduce stress on the valve, particularly when the pump is small and difficult to hold. Direct-mount pumps can be lighter and simpler but require more care to avoid bending the valve stem.
A mini pump that can inflate your tire without CO2.
A spare tube if your tires and wheels allow tube installation.
Tire levers when needed for your tire and rim combination.
Tubeless plugs and a plug tool for a tubeless setup.
A valve-core tool or Presta adapter only if your bike requires it.
Keep the cartridge and inflator together so you do not discover a compatibility problem after a flat. If you ride far from assistance, carrying a spare cartridge is usually more useful than relying on a single inflation attempt.
How to use the setup without wasting the cartridge
Before the ride, practice attaching the inflator to an old tube or a spare wheel. Learn how the valve lock, cartridge connection, and release control work. This is especially important for screw-on inflators, because cross-threading can prevent a seal.
At the roadside:
Inspect the valve and remove dirt, mud, or sealant from the connection.
Install the tube or repair the tubeless puncture according to the component instructions.
Attach the inflator securely before opening the gas flow.
Use short, controlled releases when the inflator allows it.
Check that the tire is seated evenly around the rim.
Use the mini pump if the cartridge is empty, the tire needs more air, or the inflator cannot seal.
Do not use CO2 to inflate a tire with a visible sidewall cut, damaged rim, or bead that cannot seat safely. Move the bike to a safe location and seek assistance when the tire or wheel is structurally damaged.
When a CO2-and-pump setup is the right choice
Choose this combination if you:
Want fast inflation after a road or gravel flat.
Ride far enough from home that a failed cartridge would be a serious problem.
Use high-volume tires that may require more air than one cartridge provides.
Ride tubeless and may need a quick burst to help reseat a bead.
Prefer redundancy over carrying the absolute minimum.
A CO2-only setup may be reasonable for short rides near assistance, but it has little tolerance for user error or a second flat. A mini pump alone is the simplest and most dependable option if you do not mind slower inflation.
When to replace a component
Replace the inflator if its valve seal leaks, its control mechanism sticks, or the cartridge connection is damaged. Replace a mini pump when the hose, valve head, barrel, or handle no longer seals reliably. Do not attempt to repair a pressurized CO2 head unless the manufacturer provides approved replacement parts and instructions.
If you repeatedly need more air than your cartridges can provide, the issue may be a mismatch between cartridge capacity and tire volume. Carry a larger compatible cartridge or an additional one, and keep the mini pump as the fallback rather than buying an inflator that does not match your riding needs.
FAQ
Can a mini pump replace a CO2 inflator?
Yes. A mini pump can inflate a tire without cartridges, but it generally takes longer and requires more effort. Carrying both provides faster inflation and a backup if the cartridge or inflator fails.
How many CO2 cartridges should I carry?
Carry at least one compatible cartridge for a short ride, but consider a spare for long rides, high-volume tires, tubeless bead seating, or routes where assistance is limited. Check the cartridge capacity against your tire size.
Does every CO2 inflator work with Presta and Schrader valves?
No. Some support both valves, while others require an adapter, a reversible head, or a separate connection. Confirm compatibility before buying.
Is CO2 safe for tubeless tires?
CO2 can be useful for quickly inflating or reseating a tubeless tire, but it may affect some sealants. Follow the tire, sealant, and inflator manufacturer's guidance and replace the CO2 with normal air when practical.